In this article, I’m going to walk you through how we moved several of our client’s high-traffic websites from Drupal 8 to a cloud-based Kubernetes setup. I’ll get into the specifics of how we managed to migrate a monolith to Kubernetes, enhance performance, save money on infrastructure with autoscaling, and handle DDoS attacks.
Why move a monolith to Kubernetes?
Old, rusty monoliths are still around, and this time was no different. When the owner of these Drupal-based websites reached out to us for infrastructure support, our first suggestion was migrating to Kubernetes. It was met with the usual pushback: “What would the point of that be? We’re doing just fine the way things are.” Fair enough, let’s break down the biggest “whys” we saw in this case:
- Deployment and server management rely heavily on a single administrator.
- The complete lack of automation.
- Getting things back online after a crash is a major headache.
Granted, you don’t need Kubernetes to address issues like autoscaling, self-healing, and portability. You can elaborate on a custom solution. That said, taking care of those things on your own requires a substantial time and energy investment. Not only that, but you’ll most likely end up with vendor lock-in anyway, while Kubernetes is a standard de facto in the modern infrastructure world. It makes K8s a clear winner in the long run in terms of maintaining and scaling.
Thus, moving to Kubernetes is a legitimate fix for the headaches that monolith owners have to deal with. It’s also a way to eliminate manual toil, boost system stability, automate a number of processes, and, most importantly, save on resources.
The next logical question is: “Can you actually run a specific monolith, like our Drupal-based one, in Kubernetes?” Well, you can, but…simply migrating a monolith to Kubernetes without considering all the implications is a recipe for disaster and could end up costing you a fortune in cloud resources.
Why? On top of paying for resources to match the monolith’s dedicated server (and cloud resources cost more!), you’re also going to get hit with overhead costs for Kubernetes components, load balancers, and so on. Naturally, this is not the situation we want to be in. What’s more, you’ll have to over-provision your infrastructure just to survive traffic spikes.
Thus, the main challenges you might face in handling this task are resource costs, Drupal’s performance, and where to put all the components. The architecture was a piece of cake back when it all ran on a single box, wasn’t it?
Architecture of a typical monolith
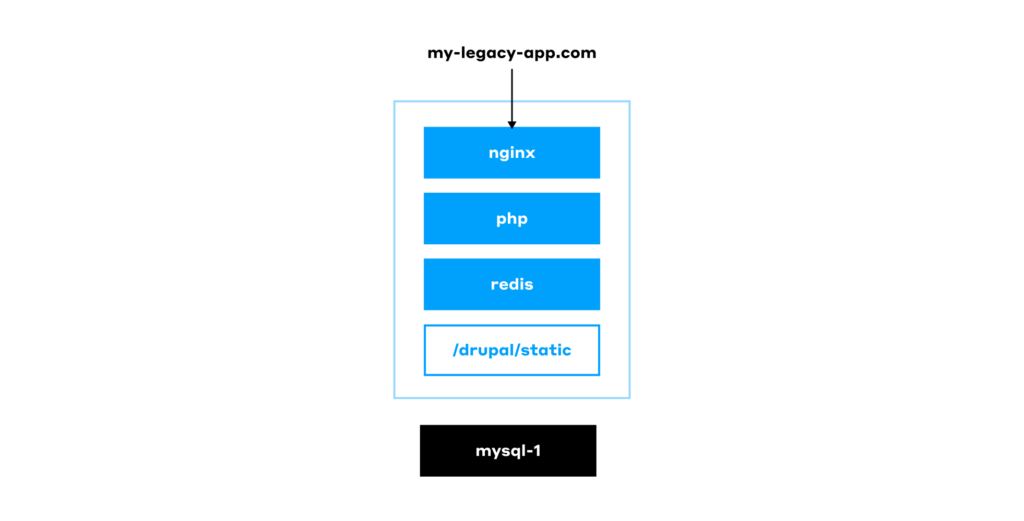
Drupal 8 was released a decade(!) ago, and it is a classic PHP-based monolith. It stores its content and settings in a MySQL database, while the file system contains directories with modules, static assets, and other files. A web server, such as nginx, is then responsible for serving all of this to the users.
We’ll skip the question of why such an old version of Drupal was in use — it’s a business decision we can’t change anyway. But even if we set Drupal 8 aside, we have to admit that this use case is not one of a kind. We’ve seen many classic monolith setups where everything is stored on a manually configured single server, with the database right there alongside it. They are still here, and sometimes it’s we who have to maintain them. Here’s how they operate:
In more advanced cases, when the reputation damage caused by an unavailable website becomes a serious concern, this basic setup is extended to include a backup server. The latter can be used to switch to in an emergency using HAProxy or a similar solution:
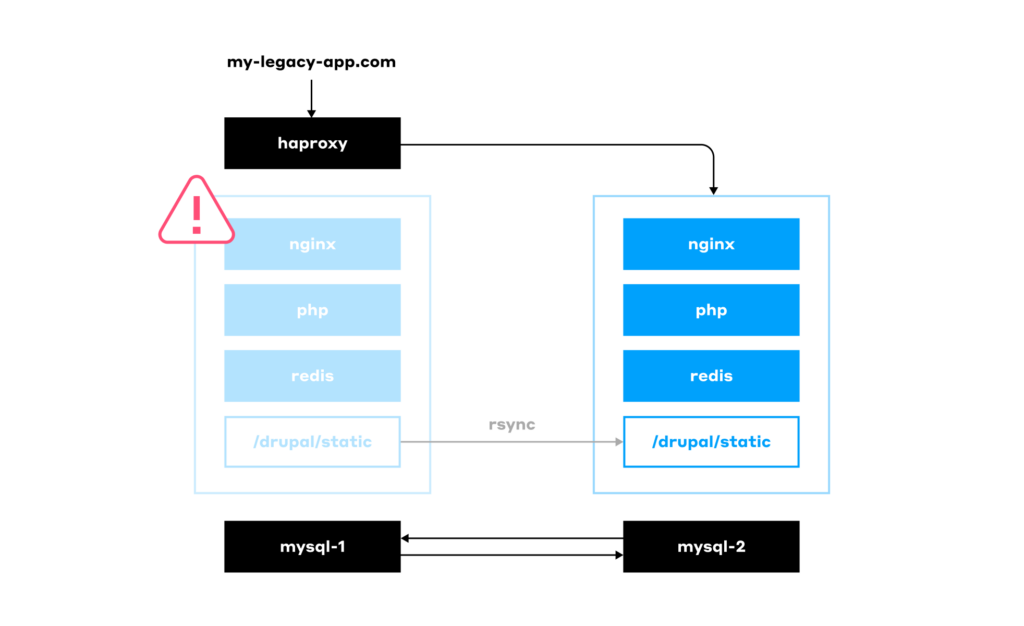
Having such a cold backup server means it’s mostly idle, incurring unnecessary costs for the client. Well, to be honest, it’s not the only downside. Here’s a list of issues for the worst-case scenario of an outdated setup used to run legacy software:
- Inconsistent infrastructure: Your servers might run different OS versions or software.
- No health checks: You have no idea if the app is actually running correctly.
- Updates are a pain.
- No CI/CD.
- Scaling is only vertical (you can only make the server bigger, not add more servers).
- Services aren’t isolated from each other.
- Failover is a manual process.
- No infrastructure automation.
- Your test environment is completely different from your production one.
- Bad performance.
- You’re overpaying for hardware.
Again, it’s not necessary that all of these limitations apply to your specific case, but this list is not fictional either — it’s what we’ve actually seen in the wild.
Next, we will see how these challenges can be addressed by migrating to Kubernetes.
While I’ve covered the “why Kubernetes?” part above, I’d like to reiterate that all the above issues can be solved without Kubernetes. For example, in AWS, you could configure autoscaling for virtual machines and route traffic using a load balancer. Another option is to package the application in Docker and deploy it to VMs using some form of automation. However, I’ll leave the opportunity to elaborate on this approach to others and proceed with K8s.
Migrating to Kubernetes
Step 1. Building
Let’s start our migration journey to a cloud-based Kubernetes environment with the build process.
First, we have to write a Dockerfile. The natural impulse is to use the official Drupal image available on Docker Hub. But that’s not a great idea: the image is too big, and it comes with the Apache web server on board (e.g., CMD ["apache2-foreground"]). It includes a lot of things we don’t need in our final image, such as PHPIZE_DEPS (gcc and composer). These cut back on the image’s security.
Thus, we’re better off using a base container — common, familiar Linux distros such as Ubuntu or Debian will suffice — and installing everything we need as we build the image. This significantly reduces the final image size and, as an added benefit, provides granular control over its dependencies. Here’s how our Dockerfile might look:
FROM ubuntu:22.04
RUN apt-get update && apt-get install -y \
    php8.1-fpm \
    php8.1-cli \
    php8.1-mysql \
    php8.1-gd \
    php8.1-curl \
    php8.1-intl \
    php8.1-bcmath \
    php8.1-soap \
    php8.1-zip \
    php8.1-xml \
    curl \
    git \
    unzip \
    zip
RUN curl -sS https://getcomposer.org/installer | php -- --install-dir=/usr/local/bin --filename=composer
COPY . /var/www/html/
RUN chown -R www-data:www-data /var/www/html/sites/default/files \
    && chmod -R 775 /var/www/html/sites/default/files
If there are multiple client websites, you’d have to maintain numerous Dockerfiles. If a change has to be made to a Dockerfile, you’d have to go through all repositories one by one to apply the same update. This increases the chances of a mistake being made. You can solve it by using werf as your primary building tool: it allows you to use templates and loops in the build process:
{{- define "site_build" }}
  {{- $project := index . 1 }}
  {{- $branchtag := index . 2 }}
  {{- $arg_arr := . }}
  {{- with index . 0 }}
---
# Backend image. Drupal
image: drupal-{{ $project }}
fromImage: drupal-base-compiled
Once the Drupal container is ready, we need to add Helm charts. Our Pod will have three containers: nginx, php, and php-fpm-exporter. Make sure to add the latter to the Pod, as you’ll be needing it later. As for nginx, it’ll serve static files, enable graceful backend shutdowns by handling in-flight requests, and proxy requests to the PHP container via fastcgi_pass.
Note: Moving the nginx container into a separate Pod that serves multiple Pods with PHP can cause 500 errors during application deployments. This can happen when a request is being processed by a backend that is in the middle of being updated.
With our Docker images building and Helm charts ready, we knocked a few problems right off our list (4 out of 11):
- Inconsistencies were eliminated — dependencies are all defined in the Dockerfile.
- Health checks are in place.
- Updates are automated.
- CI is set up.
As for CI, werf makes it much easier by being a tool for both building and deploying. Instead of a complex CI/CD pipeline with docker build, helm install, etc., you just need to use the following three commands:
werf buildwerf deploywerf cleanup
By the way, as part of the werf cleanup process, werf connects to the registry and removes any Docker images no longer used in the cluster.
Step 2. Handling static assets
The static files were stored on the same server that hosted the Drupal instance. Now we need to distribute those assets across multiple replicas. There are three potential options to do that:
- The most straightforward approach is to configure an NFS and mount it directly into the Pods.
- A more sophisticated option for those willing to undertake a complex setup is to deploy Ceph and use CephFS.
- Your developers can build a module to interact with S3.
We went with the easiest choice, NFS, figuring we could shift everything to S3 later on.
Note: For a better overview of how you should handle the files when migrating software to Kubernetes, read our “What to do with files” best practices.
Step 3. Getting things running in Kubernetes
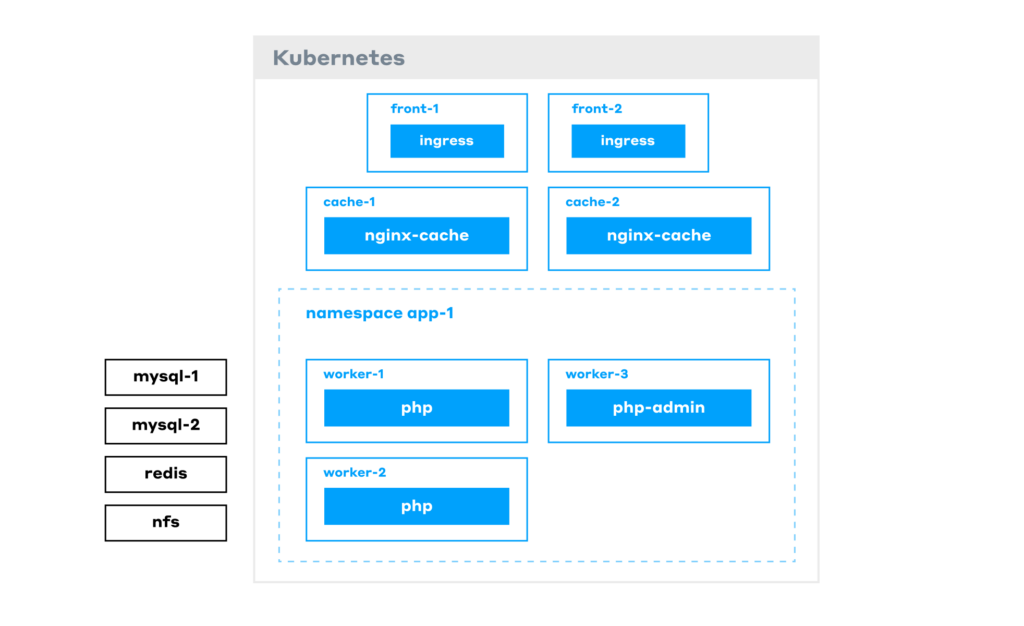
Our infrastructure now comprises:
- a Kubernetes cluster;
- MySQL/MariaDB databases on virtual machines (or as a managed solution);
- NFS mounted to the Pods.

Note: The php-admin Pods are identical to the php Pods that serve requests, except that they have write permissions to the database. These are accessed by editors who use them to add content to the website.
When all components are deployed, our app is already running. However, the biggest issue with the current approach is that it makes for a very costly infrastructure. The reason is that Drupal has poor performance out of the box, and to handle the load, you may want to scale a large number of backend Pods, which immediately adds to your bill. But we’ll get back to performance issues soon.
Note: Previously, we have also written best practices for running apps in Kubernetes, covering all essential K8s mechanisms that ensure the smooth operation of your containerized software.
Now, we still gained several benefits from this new architecture, removing 5 more issues from our list:
- Horizontal scaling is available.
- Our services are isolated.
- Fault tolerance is improved.
- Infrastructure is codified and can be easily deployed (i.e. automated).
- Deploying a testing environment identical to the production one is simple.
The two major headaches left are performance and burning money on resources. Time to get rid of them, too!
Improving Drupal performance
Step 1. Caching with Redis
What do we do when your website is slow? Implement caching! Out of the box, Drupal doesn’t work with Redis Sentinel, so you need to add a proxy layer, such as redis-proxy.
There are various ways to deploy Redis in Kubernetes — for example, you can use an operator, such as the outdated one from Spotahome. With the RedisFailover resource in place, it can deploy three Redis Pods and set up replication… However, what would happen if Drupal started using a lot of resources on the same node?
- While the switchover is ongoing, the backend would return 500 errors.
- The master would slow down and stop responding to probes.
- The operator would initiate the process of electing a new master.
The solution is to move Redis to its own dedicated node group. This setup works well until, for some reason, a failover occurs, and the master re-election process commences.
Therefore, the optimal solution is to use either a managed Redis service or a self-hosted Redis installation external to the cluster, rather than running Redis within the Kubernetes cluster itself. This is especially true for Drupal, as it makes a large number of requests to Redis for every website request.
Now, with Redis up and running reliably, Drupal Pods’ performance is improved. That’s great, but we were going to have to do better, so we had to implement an Nginx cache.
Step 2. Nginx caching
The most obvious solution is to place the cache directly within the Drupal Pod. However, restarting a Pod will clear its cache, resulting in one-third of the traffic missing the cache, meaning slow requests.
We need persistence. Ok, we can store the cache in NFS, since we already have it deployed. At the same time, all the backend Pods will go down if NFS fails or network issues occur. To address it, we’ll:
- deploy an nginx-cache StatefulSet to a dedicated node group;
- store the cache on the Persistent Volumes;
- add hard anti-affinity between the cache Pods. Otherwise, if the cache Pods are scheduled on the same node and it goes down, we’d be facing a complete outage.
Now we’re caching all incoming requests! To route content editors to the right admin Pods while bypassing the cache for them, we’ll make a quick mod to the Nginx config:
# do not cache if the cookie exists
    map $cookie_{{ pluck .Values.werf.env .Values.drupal.cookie_name | first }} $no_cache {
        "" 0;
        "~.+" 1; }
...
        proxy_cache_bypass $no_cache;
...
Note: Cookies and any other sensitive information are to be encrypted. A good way is to use a secret-values.yaml file encrypted with something like werf.
To sum it up, here’s our final architecture:
Let’s trace a request:
- It first hits the frontend nodes (where the Ingress controller resides).
- Next, it goes to the cache layer. If it’s a cache MISS, the request gets routed to the PHP Pods.
- A PHP Pod generates the response, sends it to the user, and caches it for next time.
All the other infrastructure — Redis, NFS, etc. — runs on its own dedicated VMs. As a result, performance has been significantly ramped up.
There’s just one last problem: overpaying for resources. The issue is, despite the caches, some requests still hit the backend. This means we always need to have a sufficient number of backend Pods running in the Kubernetes cluster. But we want to save money: when there’s no traffic, the number of Pods should decrease, and the cluster should let go of whatever nodes it doesn’t need.
We’ll tackle that using the Horizontal Pod Autoscaler (HPA) in Kubernetes.
Adding autoscaling to reduce infra costs
To set up autoscaling, we first need to decide on the right metric. Will it be based on CPU or requests per second (RPS)? What can provide reliable data for RPS?
- Using CPU metrics isn’t a great option. You might get a single, heavy request, let’s say an image conversion, that spikes CPU usage even though there’s no real traffic.
- We could measure RPS at the Ingress controller, but we have an nginx-cache StatefulSet in place that serves most of the requests. Only a small number of them ever end up in the backend Pods, so this metric won’t accurately reflect the extent of our need to scale our backend Pods.
- Measuring nginx RPS in the Pod sounds more reasonable. However, it’s still not quite right because some requests might not even make it to PHP (e.g., when nginx serves an image to the user).
- Therefore, the best way is to measure metrics right at the PHP level. php-fpm-exporter, a Prometheus exporter for PHP-FPM, is the perfect tool to do just that.
In our PHP-FPM configuration, we’ve set a static number of workers (pm = static, pm.max_children = n). We measure the percentage of workers that are currently busy handling requests using data from the php-fpm-exporter: (php_fpm_process_total / php_fpm_process) × 100.
Adding > 60 to this expression will mean that we trigger scaling if over 60% of workers are busy. When the HPA sees that utilization is over 60%, it runs another Pod, and the Cluster Autoscaler provisions an extra node for this new Pod.
In our case, we had several websites, so we used different namespaces and metrics to scale each website’s backend independently. By doing so we’ve stopped overpaying for resources. But doesn’t it feel like there’s something we forgot?..
Configuring cron jobs in Kubernetes
Cron jobs are often the last thing people think about. The issue is that when they run on the same machine as your backend, they inevitably grow and eat up memory. Then, at the worst possible moment, the OOM Killer steps in and terminates some critical process. To avoid this, we moved every CronJob into its own Pod using kind: CronJob.
However, high CPU usage from a CronJob on a shared node directly impacts backend performance, resulting in website lag and slow page loads. So, the next step is to move them to dedicated nodes. Even better, you can use spot nodes to cut cloud costs.
Additionally, we do not set CPU limits for CronJobs by default because they need to be constantly monitored and manually tuned. If a CronJob reaches its CPU limit, Kubernetes will start to throttle the process, which can lead to unpredictable behavior. Therefore, moving them to a dedicated node group makes even more sense.
With a dedicated node group just for running CronJobs, we ensure each website’s jobs run on a separate node.
At this point, we’ve managed to address all the issues on our list and enjoy a peaceful life. Until one day…
Protecting from DDoS attacks
Sadly, many of us have had to deal with DDoS attacks, which, as luck would have it, always seem to strike at the worst possible moment — like on a Friday evening right when you’re ready to relax after a long week. Suddenly, monitoring alerts start flooding that some of our websites are unavailable. You open Grafana and see a huge traffic surge by checking RPS on the Ingress controllers.
In our case, the problem was compounded by the fact that we used a shared Ingress controller. This meant that one website being attacked affected all of them, as the Ingress controllers would get overwhelmed and stop responding. As a result, users would start complaining to the client.
On top of that, the Horizontal Pod Autoscaler detected a surge in requests to the backend and increased the number of Pods. Thus, the client wasn’t just taking a hit to their reputation; they were literally paying to get DDoS’ed.
To address these issues, we enabled DDoS protection from the cloud provider. At first glance, things got better: users could access the website again. However, the client was still overpaying — this time for the high bandwidth costs of filtering the attack traffic through the DDoS protection service.
To get around that, we introduced two Ingress controllers: one for DDoS protection and another for direct traffic. We would use DNS to switch between them.
Unfortunately, that kind of solution came with its own set of challenges:
- The remaining shared direct controller was still a weak link: a traffic spike on one website could still affect the other websites.
- Switching via DNS is slow.
- Being constantly under protection is expensive.
So, we spun up even more Ingress controllers, assigned them to different Ingress classes, and moved each website behind its own controller. Now, each website has a direct controller of its own (that you can access via a cloud load balancer) and another one for DDoS protection:
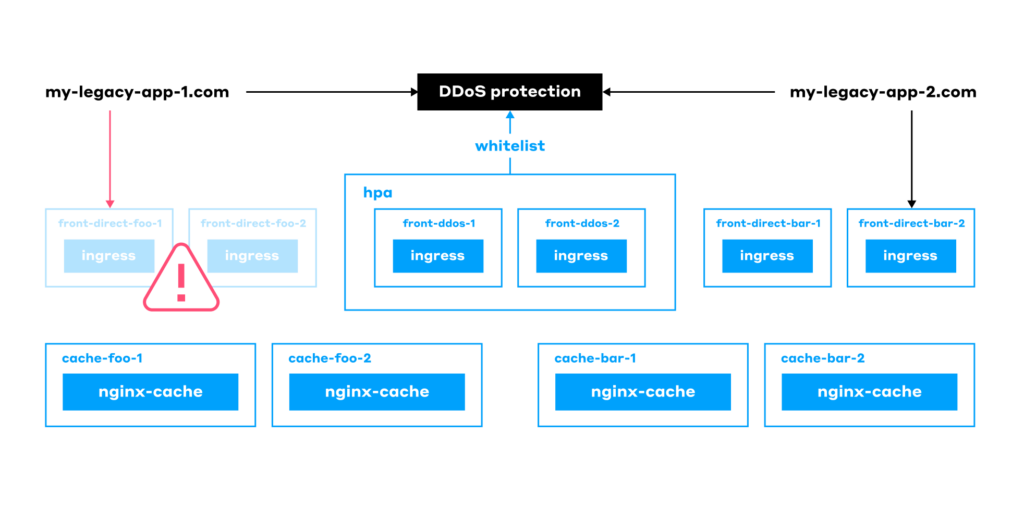
This made our final architecture feature a single shared node for DDoS protection for all the websites. At the same time, each website gets its own:
- Front nodes with a direct Ingress Controller.
- Cache.
- HPA.
- Storage (database, Redis, and so on).
Conclusion
By moving this monolith to Kubernetes, we addressed all the issues we had with the legacy Drupal setup:
- Eliminated server software configuration drift.
- Put health checks in place.
- Automated software updates.
- Set up the CI pipeline.
- Implemented horizontal scaling.
- Implemented complete service isolation.
- Improved fault tolerance.
- Set up infrastructure automation.
- Deployed a testing environment identical to the production one.
- Improved the system’s performance.
- Optimized costs and stopped overpaying for resources.
- Implemented DDoS protection for all the websites.
So what about the total cost of ownership for this case? This table sums up technical and business-related concerns that should be considered:
| Legacy monolith app | Kubernetes-based setup | |
|---|---|---|
| Infrastructure/cloud costs | $ | $ |
| Reputational risks | $$$$$$$ | $ |
| Maintenance costs | $ | $$$$$$$ |
Here’s the reasoning behind this data:
- We can say the infrastructure costs are about the same because we tried to save as much as possible on the Kubernetes cluster. With the classic architecture, we would’ve had to keep a huge piece of hardware and pay a lot for it.
- Reputational risks (or should you call them costs as well?) have surely decreased. Before, if a server crashed, clients had to wait for an admin to come and fix everything. With Kubernetes, the system automatically heals itself, Pods get restarted, and downtime is next to nothing.
- Maintenance costs are obviously higher. While a single administrator could manage the old Drupal server, the new setup requires specialists with expertise in Helm, Kubernetes, and related technologies. However, if you lack particular in-house talent, that expertise can be outsourced to companies that offer SRE as a Service with 24/7 on-call support.
With a few minor tweaks, the setup we built for Drupal works great for any monolith, whether it’s built on Laravel, Symfony, Java, Django, or Ruby on Rails. It’s quite a universal path that has proven foolproof.

Comments