PG Back Web* is a tool that provides a web UI to help you manage your PostgreSQL backups with ease. Let’s have a look at what it is capable of doing and the way its interface looks, as well as deploy it to Kubernetes.
* Since its most recent PG Back Web release — v0.5.1, issued earlier in October 2025 — the project seems to have a new name: UFO Backup, yet even its GitHub repo hasn’t been renamed yet.
Brief introduction
PG Back Web is an Open Source application for PostgreSQL database backup and recovery management. It uses pg_dump (format=plain) under the hood to create backups, and psql -f to restore the database. Currently, it supports PostgreSQL versions 13, 14, 15, 16, 17, and 18. Notably, the PostgreSQL v18 support was introduced in PG Back Web v0.5.0, released last month, just two days after the official PgSQL release!
PG Back Web also includes a set of tools to monitor database availability and whether or not the backup was successful. The source is written in Go and available under the AGPL 3.0 license.
According to the recent announcement that PG Back Web will be renamed UFO Backup, the authors plan to go beyond PostgreSQL and extend their software capabilities to support backups for other products. No specific plans are officially revealed yet, but this Reddit thread confirms that UFO Backup should at least support MariaDB and MySQL in the future.
While those are the features we might only expect later, let’s focus on what’s available today in the original PG Back Web, intended for PgSQL database administrators only.
PG Back Web features
Here is what UFO Backup offers for PostgreSQL backups:
- a web interface that is easy to use, configure, and deploy (to a Kubernetes cluster, too!);
- storing backups in the S3-compatible object storage as well as the local directory;
- on-demand and scheduled backups, backup lifecycle management;
- sensitive data encryption with PGP;
- monitoring whether the backup completed successfully and whether PostgreSQL and object storage are available, including the ability to connect this monitoring to an external alerting system.
That being said, I found the following drawbacks in its features. Currently, PG Back Web lacks:
- user roles with different permissions;
- the ability to control all
pg_dumpCLI parameters (notably, you can’t specify--format=custom); - backing up all the databases of a PostgreSQL instance via
pg_dumpallorpg_basebackup; - support for
pg_basebackup; - the ability to implement PITR;
- the option to manually set filters for the backup list.
However, I would like to point out that most of the drawbacks are very much the result of the solution’s strengths, namely its simplicity. The approach it uses fits perfectly into the ideology of Cloud Native databases, where “one DBMS instance = one database.” On top of that, the backup method used is completely independent of where and how the DBMS is deployed and who manages it.
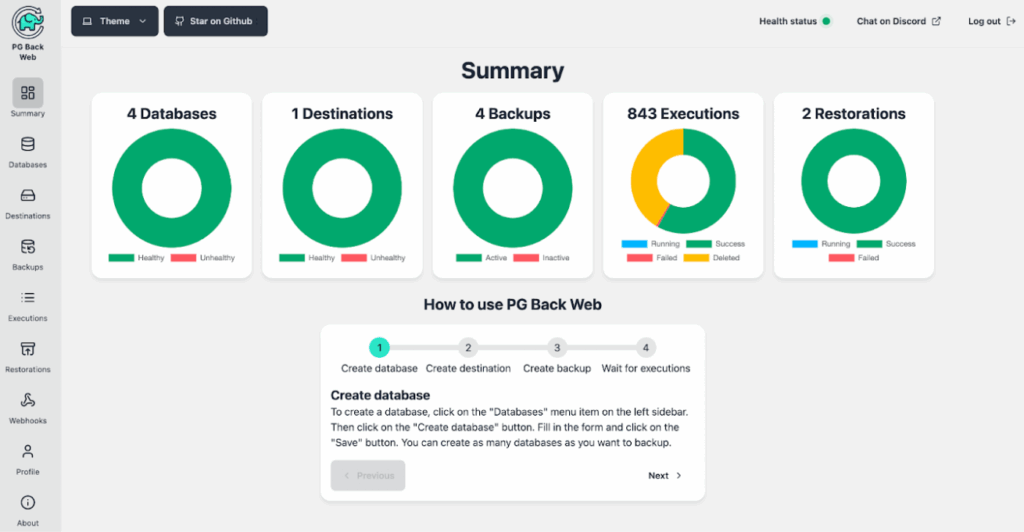
PG Back Web interface overview
The interface is clear and concise. It includes six main sections.
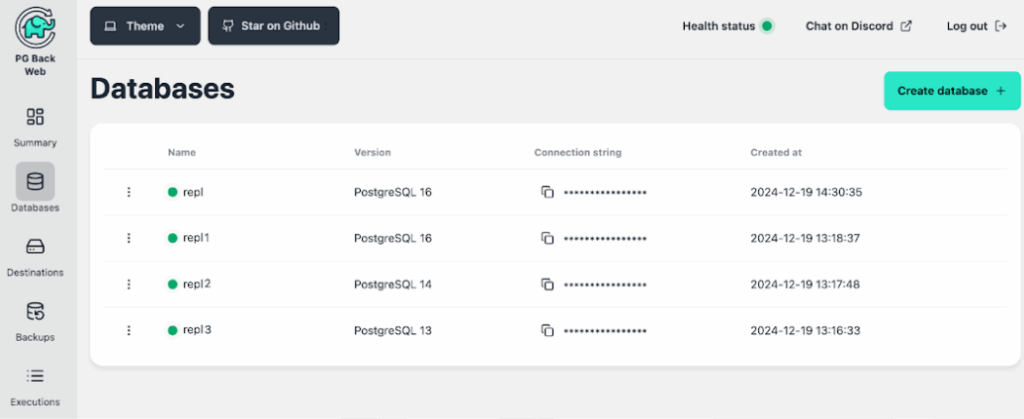
1. Databases
In this section, you can manage the database connections. The Create database button allows you to add a new connection. In the form that appears, you need to specify the name, the PostgreSQL version, and the connection string. You can also access the list of backups (Executions) filtered by database.
2. Destinations
Similarly, you can manage object storage connections here. In the form that pops up when you create a new destination, specify the destination name, bucket name, endpoint, region, access key, and secret key.
3. Backups
Obviously, this section is one of the most essential ones as it allows you to manage the backups and their schedules. When creating a schedule, you must indicate:
- the name of the backup job;
- one of the databases configured in Databases;
- whether to save the backup to a local directory or object storage;
- select one of the object storages, as configured in Destinations, if the backup is to be pushed to the object storage;
- specify the path to the backup directory (the Destination directory), if the backup is to be saved to a local directory;
- the schedule in regular cron format;
- the length of time for which the backups are to be kept (in days).
In each run, it’s checked whether the stored backups are current. For example, if a backup is performed once an hour and the retention period for backups is 1 day, then for every successful backup, a backup made 25 hours ago will be deleted.
If necessary, you can adjust some pg_dump parameters. Namely, those that are configurable are --data-only and --schema-only, --clean, --create, --if-exists, and --no-comments.
Since PG Back Web has no access to physical servers, enabling a Local backup means that backups will be saved to the disk of the PG Back Web instance. When you set the Destination directory for a backup of the Local type, it becomes a subdirectory inside /backups. For example, if you enter the following path: /tmp/repl1, your backup will be saved into /backups/tmp/repl1/2025/10/10/dump-20251010-foo-bar.zip.
If your PG Back Web instance is running in Kubernetes, you have to mount a volume to the /backups directory to store the dumps.
The Backups section allows you to initiate a backup manually. You can also go to the Executions section to view the scheduled executions.
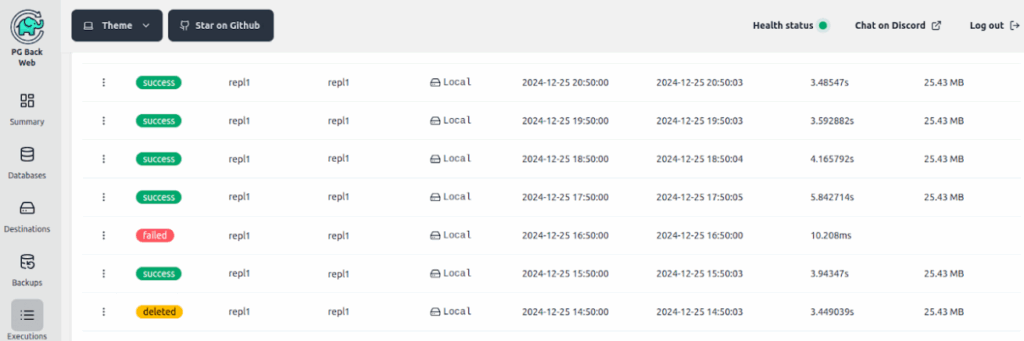
4. Executions
In this section, you can see a list of all active and deleted backups. For operations that ended with an error, you can view the error message without having to find the relevant log in the Pod. You can also download a successfully completed dump.
5. Restorations
Here, you will find a list of all restore operations for a backup. Note, however, that you have to return to the Executions section to initiate the restoration. To do so, select the desired backup, choose Restore execution in the context menu, and choose one of the databases configured in the Databases section or specify an arbitrary connection address as the destination.
If your PG Back Web is running in Kubernetes, you need to mount the volume in /tmp because PG Back Web downloads the selected dump to that directory, decompresses it, and performs a call like this one:
/usr/lib/postgresql/16/bin/psql postgresql://pbweb:*******@192.168.100.19:5433/repl1 -f /tmp/pbw-restore-1760110522/dump.sql6. Webhooks
In this section, you can configure monitoring for backups and database and object storage availability. By specifying the URL of your incident management system and the specific parameters you want to pass there, you will be notified when errors occur during the backup procedure or when selected PostgreSQL databases become unavailable. The latter is detected via automatic availability checks performed every 10 minutes.
You can also configure the Dead man’s switch-type backchecking to ensure that backups are running and to confirm database/object storage availability. With this mechanism enabled, the monitoring system is pushed with an uptime confirmation every 10 minutes. If the confirmation is not obtained within the set time, the system automatically triggers an alert.
How to deploy PG Back Web in Kubernetes
Essentially, to deploy PG Back Web to a cluster, you need to create four Kubernetes objects: StatefulSet, Secret, Service, and Ingress. Below are the listings you can use as examples.
Kubernetes manifests
1. First of all, here comes a StatefulSet for the application:
apiVersion: apps/v1
kind: StatefulSet
metadata:
 name: pgbackweb
spec:
 serviceName: pgbackweb
 selector:
   matchLabels:
     app: pgbackweb
 replicas: 1
 template:
   metadata:
     labels:
       app: pgbackweb
   spec:
     containers:
     - name: pgbackweb
       image: eduardolat/pgbackweb:0.5.1
       envFrom:
       - secretRef:
           name: pgbackweb
       volumeMounts:
       - name: backup
         mountPath: /backups
       - name: tmp
         mountPath: /tmp
       resources:
         requests:
           cpu: 5m
           memory: 1Gi
         limits:
           memory: 1Gi
       livenessProbe:
         failureThreshold: 3
         httpGet:
           path: /
           port: http
           scheme: HTTP
         initialDelaySeconds: 20
         periodSeconds: 5
         successThreshold: 1
         timeoutSeconds: 2
       readinessProbe:
         failureThreshold: 3
         httpGet:
           path: /
           port: http
           scheme: HTTP
         initialDelaySeconds: 10
         periodSeconds: 5
         successThreshold: 1
         timeoutSeconds: 2
       ports:
       - containerPort: 8085
         name: http
         protocol: TCP
 volumeClaimTemplates:
 - apiVersion: v1
   kind: PersistentVolumeClaim
   metadata:
     name: backup
   spec:
     accessModes:
     - ReadWriteOnce
     resources:
       requests:
         storage: 100Gi
     storageClassName: ceph-ssd
     volumeMode: Filesystem
 - apiVersion: v1
   kind: PersistentVolumeClaim
   metadata:
     name: tmp
   spec:
     accessModes:
     - ReadWriteOnce
     resources:
       requests:
         storage: 100Gi
     storageClassName: ceph-ssd
     volumeMode: Filesystem
2. A Secret for the application:
apiVersion: v1
kind: Secret
type: Opaque
metadata:
name: pgbackweb
data:
  PBW_ENCRYPTION_KEY: M2VvUmt1ZW9TbXpvcnlvaXdYYXNpa2RwNGEzaWFuYw==
  PBW_POSTGRES_CONN_STRING: cG9zdGdyZXNxbDovL3Bid2ViOm15cGFzczEyM0Bwb3N0Z3Jlczo1NDMyL3BnYmFja3dlYj9zc2xtb2RlPWRpc2FibGU=
  TZ: RXVyb3BlL0Jlcmxpbg==
All data values are encoded in Base64. Keep in mind that when encoding variable values to store as Secrets in Base64, you need to remove any line breaks.
Note that the encryption key set by the PBW_ENCRYPTION_KEY environment variable is NOT used to encrypt backups. It is used to encrypt sensitive user settings that are stored in the app’s database. This is because the PG Back Web database can be accessed by anyone other than the backup administrator.
3. A Service for the application:
apiVersion: v1
kind: Service
metadata:
  name: pgbackweb
spec:
  clusterIP: None
  selector:
    app: pgbackweb
 ports:
 - name: http
   port: 8085
4. Finally, an Ingress resource for the application:
apiVersion: networking.k8s.io/v1
kind: Ingress
metadata:
  name: pgbackweb
spec:
  rules:
  - host: pgbackweb.sample.com
    http:
      paths:
      - path: /
        pathType: Prefix
        backend:
          service:
            name: pgbackweb
            port:
              name: http
  tls:
  - hosts:
    - pgbackweb.sample.com
    secretName: pgbackweb-tls
Applying these YAML manifests will allow you to deploy PG Back Web to a Kubernetes cluster.
Takeaways
PG Back Web is a cloud-ready solution, featuring a simple, convenient, and stable web interface. I can definitely recommend it for managing backups for relatively small PostgreSQL databases, i.e., in cases where you don’t need a binary copy of the cluster files or need to specify a custom format for backups. However, for other cases, it depends on your specific requirements.
Seeing this project evolve into a bigger backup solution, rebranded as UFO Backup, and catering to other technologies (other than just PgSQL) is something worth watching for everyone who liked the philosophy and implementation of an existing tool.

Comments